1. Introduction
The intent of this document is to organize all my notes during my journey of learning about integration technologies that can be deployed on a kubernetes / OpenShift platform. Coming from a background of understanding integration before these platforms, I find that I am often just trying to adapt what I know to what is now possible.
In the past, when there was no platform to manage your workloads, we would leverage tools such as Apache Camel and Apache ActiveMQ to build out functionality. Projects such ServiceMix and JBoss Fuse assisted in providing a consistent run-time, however many enterprise requirements had to be tailored to the infrastructure that was available.
With kubernetes / OpenShift, more of these enterprise requirements can be satisfied in a consistent manner. And perhaps more importantly, Apache Camel, Apache ActiveMQ, and Strimzi (AMQ Streams) have evolved with these platforms. This is where I like to focus my learning, finding ways that OpenShift can make Integration easier to consume in the enteprise.
As part of this learning path, I did take a detour in provisioning an OpenShift cluster in my homelab. This step is certainly not required, however there is a need to have a place where you can deploy these projects into an OpenShift cluster.
After acquiring a platform for an integration playground, topics that are to be explored will start with Camel and its subprojects.
-
Camel Core
-
Camel K
-
Kamelet
-
Camel Quarkus
-
Camel Karavan
Messaging
-
AMQ Broker
-
AMQ Streams
2. Homelab Infrastructure
While not required to have a homelab for software development, having one can be a valueable learning experience. The intent of this guide is to document the steps to provision an OpenShift environment that can host a variety of Open Source integration technologies. In addition, it will document steps to make your OpenShift cluster accessible from outside your home network.
2.1. Homelab Architecture
The following is a high level diagram of the hardware for my homelab.
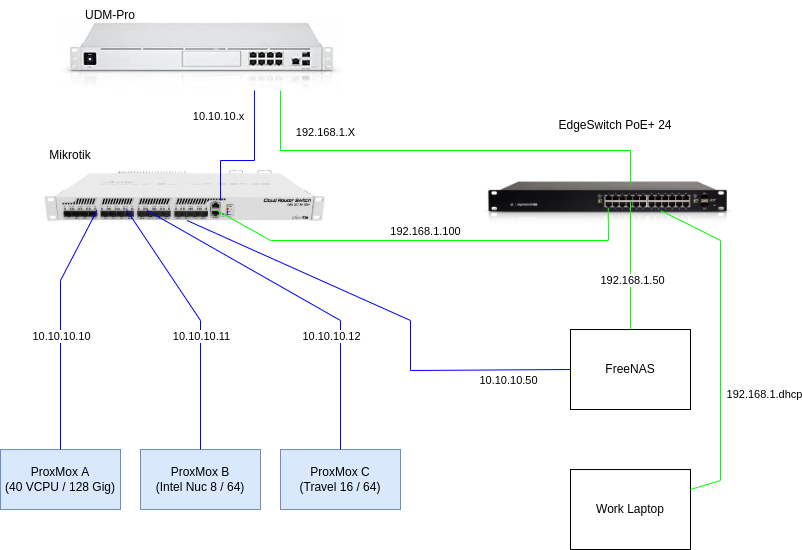
In the top left of the diagram is the Unifi Dream Machine Pro (UDM-Pro). This router has the ability to create multiple networks and handles the routing between each network. For the purposes of this overview, there are two networks created:
-
192.168.1.x: handles all non-homelab traffic in my home. This would include Network APs and general home stuff. -
10.10.10.x: homelab network traffic, which at this point is an OpenShift Cluster.
The EdgeSwitch PoE+ 24
is the switch that I use for 192.168.1.x network. While there are a number
devices attached to this network, for the purposes of this guide there is a FreeNas and Work Laptop.
There is a FreeNAS baremetal node that I hope to encorporate into the OpenShift Cluster in the
future. My Work Laptop exists on the 192.168.1.x network and can route to the 10.10.10.x network as
needed.
For the homelab network, a Mikrotik Router Switch was used due to its ability to switch traffic at 10 gbe speeds. Connected to this Mikrotik Router Switch are three baremetal computers which will become hosts to the OpenShift Cluster.
2.1.1. Architectural Decisions
-
Traffic for the homelab should not interfere with other home network traffic.
-
Traffic within the homelab network should switch at 10 gbe speeds.
-
Use of a virtualization platform on the baremetal computers.
-
Hardware should meet or exceed minimum hardware requirements for OpenShift.
2.2. Virtualization Platforms
There are a number of choices that were considered for a homelab virtualization platform.
-
Red Hat Virtualization: Based on KVM.
-
ProxMox VE: Also based on KVM.
-
VMWare ESXi: Costs money / not open source.
VMWare ESXi was evaluated and quickly reached the limit of managing virtual machines across multiple hosts was a feature that not included in the free version. ProxMox was the next to be evaluated and found the overall installation and provisioning of virtual machines to be fairly straightforward. I also was able to cluster the three nodes on my network, making it easier to manage all VMs in a central location.
Red Hat Virtualization is also a viable option and I hope to evaluate in a future homelab execise. My experience with ProxMox was so positive that I just decided to go with that platform.
2.2.1. Minimum Requirements
As mentioned in the documentation for the current OpenShift release (4.10.3), the following is the minimum hardware requirements:
-
Control plane nodes: At least 4 CPU cores, 16.00 GiB RAM, 120 GB disk size for every supervisor.
-
Workers: At least 2 CPU cores, 8.00 GiB RAM, 120 GB disk size for each worker
-
Single Node OpenShift (SNO): One host is required with at least 4 CPU cores, 16.00 GiB of RAM, and 120 GB of disk size storage.
-
Also note that each host’s disk write speed should meet the minimum requirements to run OpenShift.
2.2.2. ProxMox Configuration
There are a number of guides that can walk you through the provisioning of ProxMox VE. For a deep dive on how to install, the following guide is very helpful.
Here is a simplified set of steps that I used:
-
Download the latest ISO from: https://www.proxmox.com/en/downloads
-
Follow the install steps to provision on bare metal.
-
Configure with a static IP (
10.10.10.10,10.10.10.11,10.10.10.12) and I choose the following hostnames (pve1,pve2,pve3).
Upon completing the install across all three nodes, then follow the steps in the GUI to "Create Cluster". I found the Cluster Manager to be quite useful as all hosts were presented in a single location. Additional features such as easy migration of virtual machines and the ability to make cluster-wide configurations are just some of the features that make it worth it to cluster.
2.3. OpenShift Assisted Installer
This guide was contructed for an OpenShift Assisted Cluster install. The basic premise of this approach is that you create / declare your cluster in the Red Hat Hybrid Cloud Console.
Upon selecting "Create cluster", then select "Datacenter" and then "Bare Metal (x86_64)". At this point there is an option to select "Assisted Installer (Technology Preview)". In the subsequent dialog, there is an option to name the Cluster. Just remember that you may find the need to find your cluster in a Red Hat Hybrid Cloud Console search, so it would be advantageous to name your cluster something unique (stay away from ocp / playground!).
In my case, I named my cluster after my hometown Oklahoma City (okc). For a base domain, I have a registered domain name and also have intentions to access this cluster from outside my homelab, so I used my registered domain. Also in this dialog, there is an option to install single node OpenShift (SNO) or on arm64 CPU architectures. Since my homelab has multiple hosts and is x86 based, I did not select these options.
In the next dialog, the configuration of hosts is covered. Upon selecting "Add Hosts", a pop up dialog is presented where you can download an Discovery ISO image. I leveraged the Full Image file with the hopes that this would speed up the OpenShift provisioning process.
Upon downloading the image, it is important to make this image available to each node in the ProxMox VE cluster. For each node, select the local disk and then the "ISO Images" button in the configuration table. This is depicted in the following figure:

By uploading the ISO, it will then be available to the create VM process dialogs.
2.4. ProxMox Provision
Once you have the ISO Images added to the filesystems, then it is just a matter of creating VMs for the OpenShift installer. The beauty of the assisted installer is that it will auto-choose the role of the each VM/Node based on its hardware profile.
Since my homelab has 3 bare metal nodes, my approach has been to allocate a control-plane-sized VM on each bare metal node giving some notion of high availability. I then allocate the balance of the hardware resources to an additional VM.
Specifically, my three hosts have the following hardware profiles:
-
pve1: 40 VCPUs, 128 GiB Ram, 1 TB -
pve2: 16 VCPUs, 64 GiB Ram, 500 GiB disk -
pve3: 8 VCPUs, 64 GiB Ram, 500 GiB disk
Which is then decomposed into the following VMs:
-
pve1 \ ocp1: 4 VCPU, 16 GiB Ram, 120 GiB disk -
pve1 \ ocp4: 36 VCPU, 112 GiB Ram, 700 GiB disk -
pve2 \ ocp2: 4 VCPU, 16 GiB Ram, 120 GiB disk -
pve2 \ ocp5: 12 VCPU, 48 GiB Ram, 240 GiB disk -
pve3 \ ocp3: 4 VCPU, 16 GiB Ram, 120 GiB disk -
pve3 \ ocp6: 4 VCPU, 48 GiB Ram, 240 GiB disk
Upon provisioning the VMs with the provided ISO Image, the hosts will register themselves with the Red Hat Hybrid Cloud Console, roles are assigned, and then the OpenShift cluster is installed across the hosts.
The following diagram depicts how the ProxMox Console looks after the VMs are deployed and started.

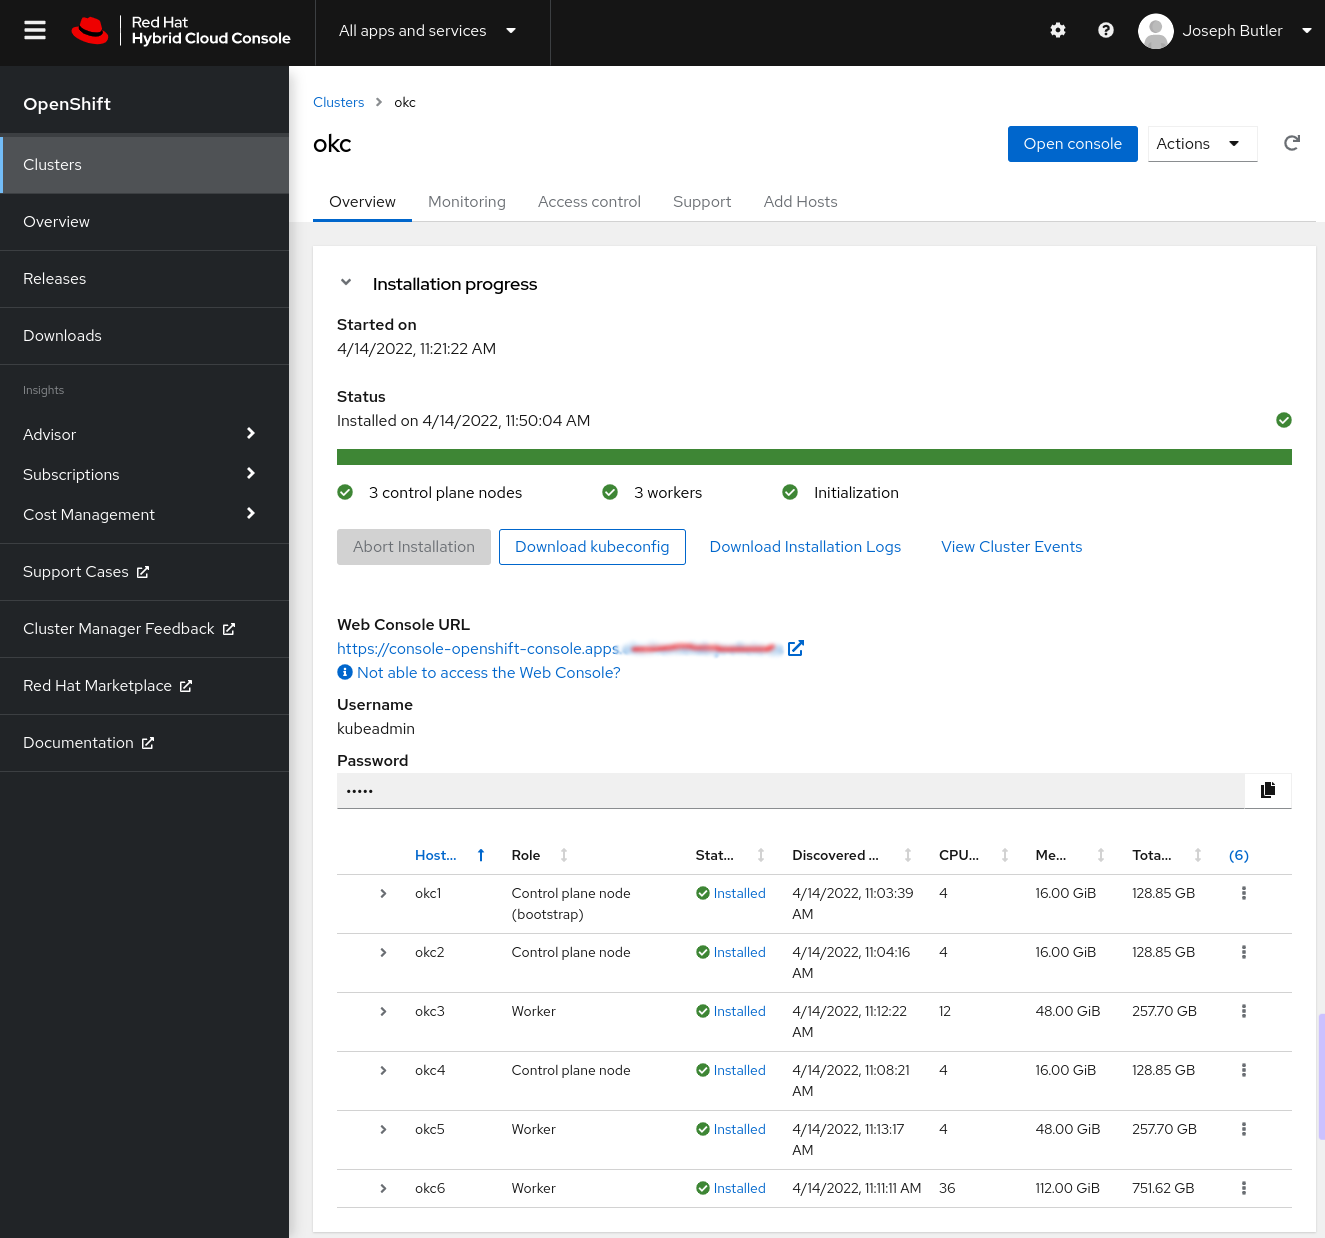
2.5. Red Hat Hybrid Cloud Console
As mentioned, the VMs will continue to provision and then finish the install of the OpenShift
Platform. Upon completion, the console view provides access information to your own cluster,
along with guidance on updating your DNS Server or updating a local /etc/hosts
or /etc/resolv.conf.
As an example, the Cluster Console will look similar to the following:
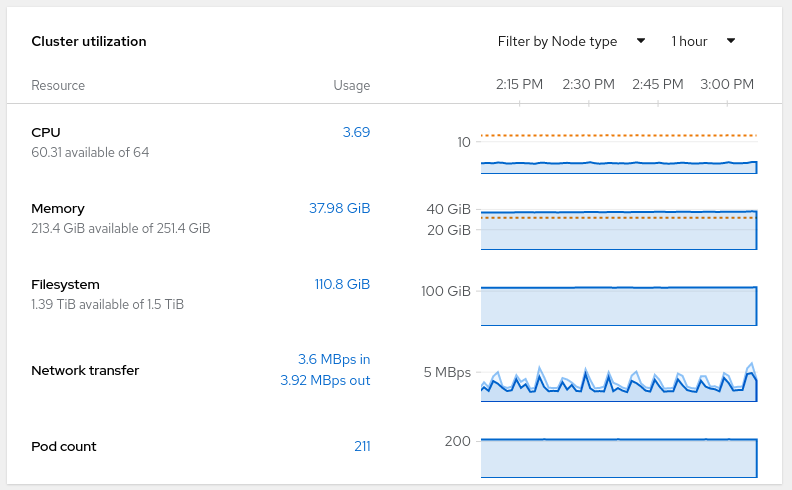
The Cluster utilization should match up to the amount of resources allocated to the VMs in the ProxMox Cluster, as picted in the following:
3. Camel K
Intoduction.
3.1. Background
Talk about strategies / youtube links
3.2. Prepare the OpenShift Cluster
steps to provision operators
3.3. Simple Hello World
just get one running
3.4. Talk about IDE
guidance on what is available, developer workflows
3.6. Integration with Git
show how to manage that integration in source reppository
3.7. Integration with DevOps
How to get that going
4. Camel Karavan
Intro
4.1. Setting up environment
install operators
4.2. IDE vs WebApp
go through options
4.3. Git integration
experience here
4.4. DevOps options
experience here